구현 개요
- 현재 보여줄 데이터의 범위를 추적할 변수가 필요합니다. 예를 들어, currentStartIndex라는 변수를 사용해 3개의 데이터를 선택적으로 표시합니다.
- 버튼 클릭 시 인덱스 업데이트: 버튼을 누르면 currentStartIndex를 3씩 증가시키고 테이블뷰를 다시 로드하여 새로운 데이터로 교체합니다.
- 테이블뷰 갱신: tableView.reloadData()를 사용해 새로운 데이터를 표시합니다.
// nearbyTable 더보기 관련 현재 보여줄 데이터의 시작 인덱스
var currentStartIndex: Int = 0
// nearbyTable 더보기 관련 한 번에 보여줄 데이터의 개수
var pageSize = 3
// nearbyTable 더보기 관련 샘플데이터
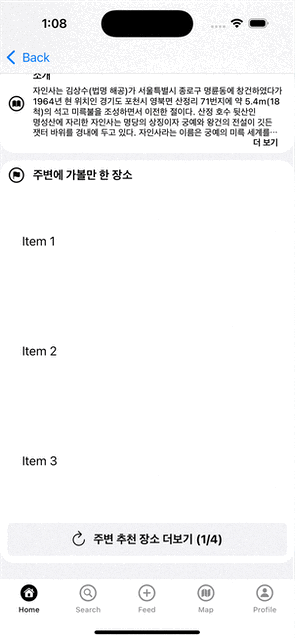
var allData = ["Item 1", "Item 2", "Item 3", "Item 4", "Item 5", "Item 6", "Item 7", "Item 8", "Item 9", "Item 10"]
"더 보기" 버튼을 눌렀을 때 호출되며, 인덱스를 업데이트하고 테이블뷰를 갱신하는 역할을 합니다.
 // 버튼 클릭 시 호출되는 메서드
    @objc func loadMoreData() {
        // 페이지 업데이트
        if currentStartIndex + pageSize < allData.count {
            currentStartIndex += pageSize
        } else {
            currentStartIndex = 0
        }

        // 테이블뷰 갱신
        detailSpotView.nearbyTableView.reloadData()

        // 버튼 텍스트 갱신
        configureButton()
    }
앱을 실행하고 처음에는 나오는 버튼을 설정하기 위한 함수이자, 버튼에 들어가는 텍스트 및 카운트를 설정합니다.
// 버튼 텍스트 업데이트 및 설정
    func configureButton() {
        // 페이지 수 계산
        let totalPages = Int(ceil(Double(allData.count) / Double(pageSize)))
        let currentPage = (currentStartIndex / pageSize) + 1

        // UIButton 설정
        var configuration = UIButton.Configuration.filled()
        var titleContainer = AttributeContainer()
        titleContainer.font = UIFont.systemFont(ofSize: 16, weight: .bold)

        configuration.baseForegroundColor = .label
        configuration.baseBackgroundColor = .secondarySystemBackground
        configuration.attributedTitle = AttributedString(
            "주변 추천 장소 더보기 (\(currentPage)/\(totalPages))",
            attributes: titleContainer
        )
        configuration.titleAlignment = .center
        configuration.image = UIImage(systemName: "arrow.clockwise")
        configuration.preferredSymbolConfigurationForImage = UIImage.SymbolConfiguration(pointSize: 15)
        configuration.imagePadding = 10
        configuration.titleAlignment = .leading

        // 버튼 설정 적용
        detailSpotView.button.configuration = configuration
    }
버튼에 함수를 연결하는 함수입니다.
    func didTappedLoadMoreButton() {
        detailSpotView.button.addTarget(self, action: #selector(loadMoreData), for: .touchUpInside)
    }
UITableViewDelegate, UITableViewDataSource에 셀의 개수와 표시할 셀을 등록합니다.
// MARK: - UITableViewDelegate, UITableViewDataSource
extension DetailSpotViewController: UITableViewDelegate, UITableViewDataSource {

    func numberOfSections(in tableView: UITableView) -> Int {
        return 1
    }

    func tableView(_ tableView: UITableView, numberOfRowsInSection section: Int) -> Int {

        let remainingDataCount = allData.count - currentStartIndex

        return min(pageSize, remainingDataCount)
    }

    func tableView(_ tableView: UITableView, cellForRowAt indexPath: IndexPath) -> UITableViewCell {

        let cell = tableView.dequeueReusableCell(withIdentifier: "cell", for: indexPath)
        let index = currentStartIndex + indexPath.row
        cell.textLabel?.text = allData[index]
        return cell

    }

    func tableView(_ tableView: UITableView, heightForRowAt indexPath: IndexPath) -> CGFloat {
        return 150
    }
}
🔥 추가로 해봐야하는 거는 마지막에 4/4 되고 더보기 눌렀을 때 뷰가 이동하는 것까지 해보자
'UIKIT' 카테고리의 다른 글
| ViewController 에서 init을 통해 데이터를 전달하는 방식이 깔끔한 이유 (0) | 2024.10.22 |
|---|---|
| JSON에서 받아온 homepage 데이터는 HTML 태그 제거 (1) | 2024.10.22 |
| 셀의 개수에 맞춰 자동으로 높이가 조절되는 테이블 뷰를 구현 (1) | 2024.10.21 |
| HomeFeedTableViewCell에서는 navigationController에 접근할 수 없어서 문제가 발생 (0) | 2024.10.19 |
| 앱의 데이터 갱신하려면 어떻게 할까? (0) | 2024.10.16 |


