
https://developer.apple.com/documentation/uikit/views_and_controls/collection_views
Collection views | Apple Developer Documentation
Display nested views using a configurable and highly customizable layout.
developer.apple.com
https://developer.apple.com/documentation/uikit/uicollectionview
UICollectionView | Apple Developer Documentation
An object that manages an ordered collection of data items and presents them using customizable layouts.
developer.apple.com
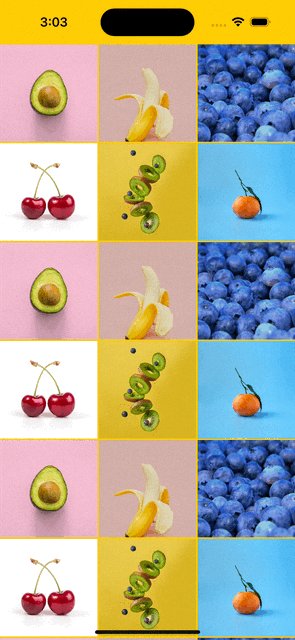
완성 이미지
구현
코드로 구현하기 때문에 StoryBoard 파일을 삭제하고
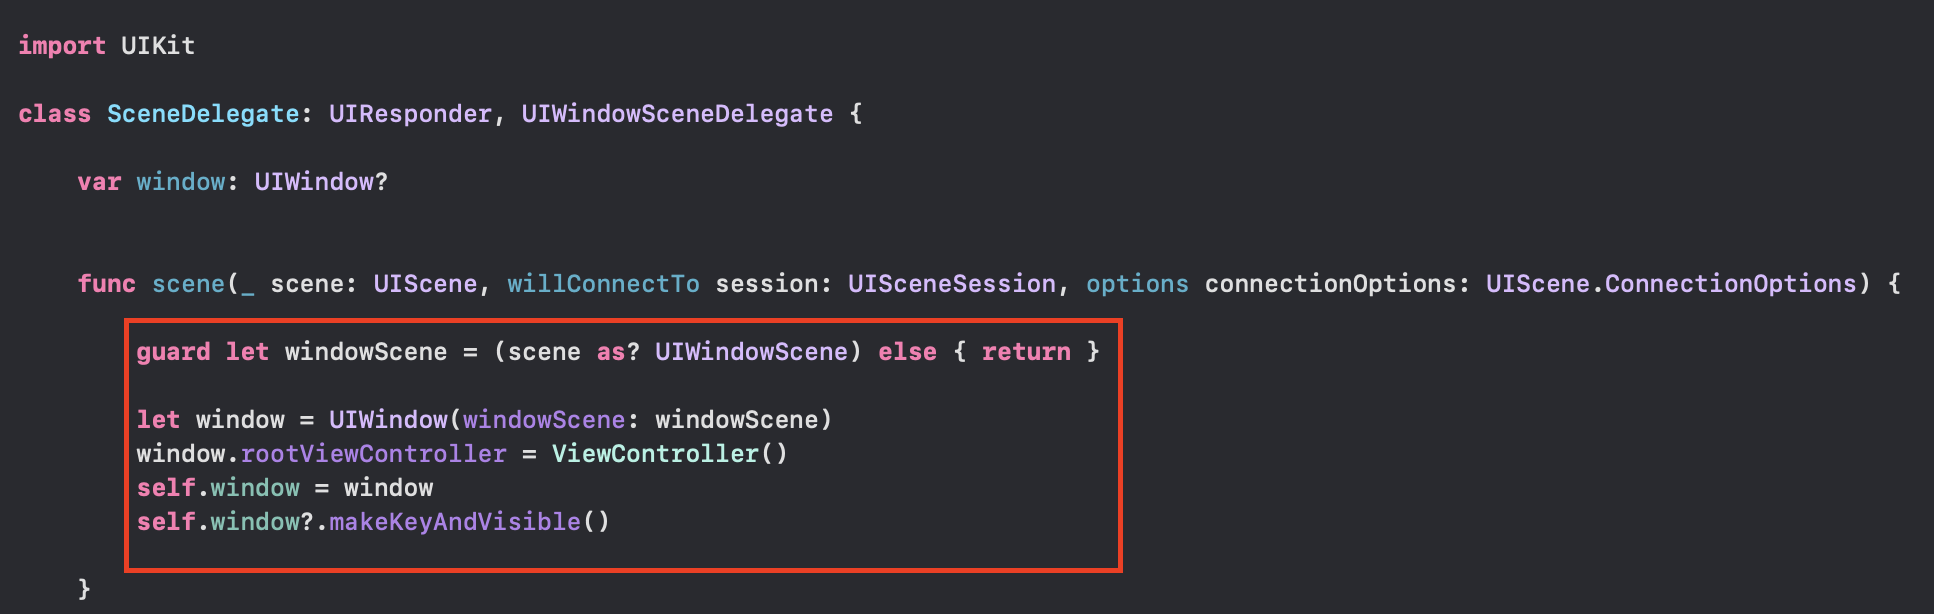
sceneDelegate.swift 파일 내에 코드 구현
ViewController.swift 파일 내에 collectionView 구현
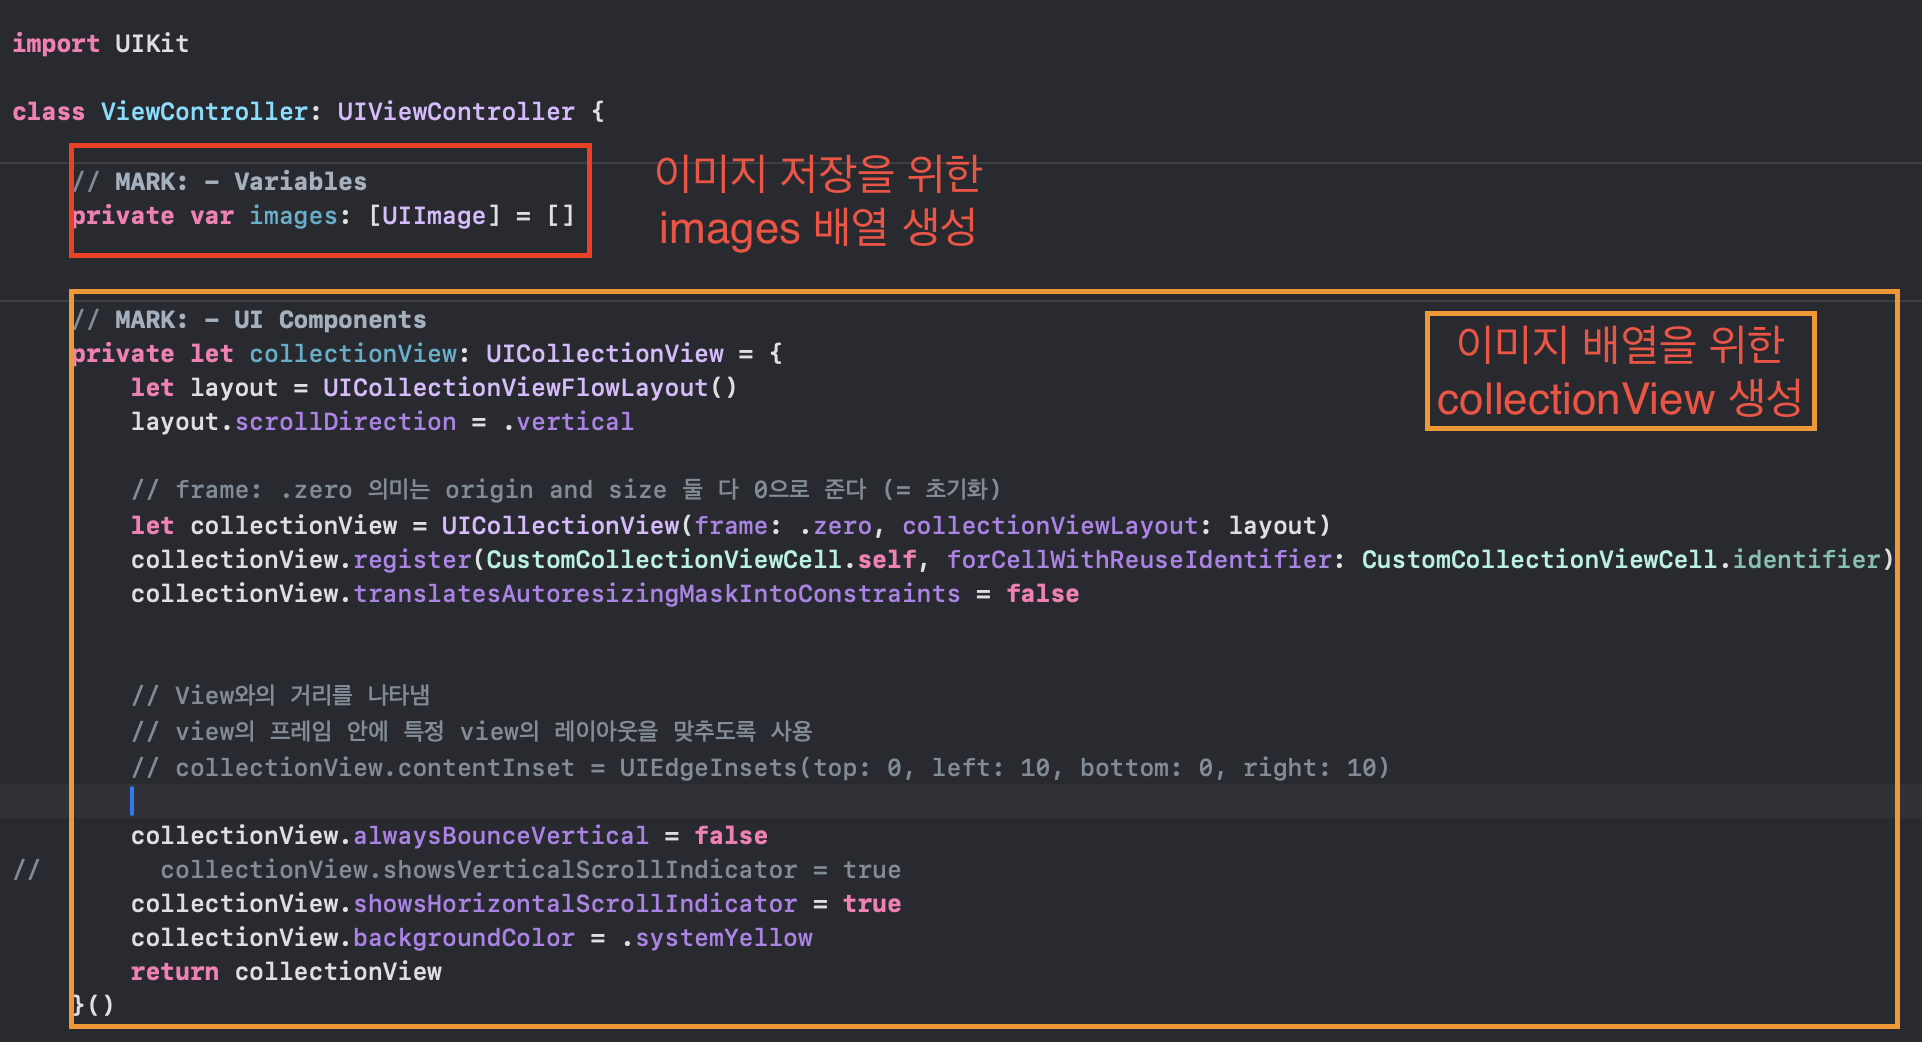
collectionView를 UICollctionView 타입으로 생성
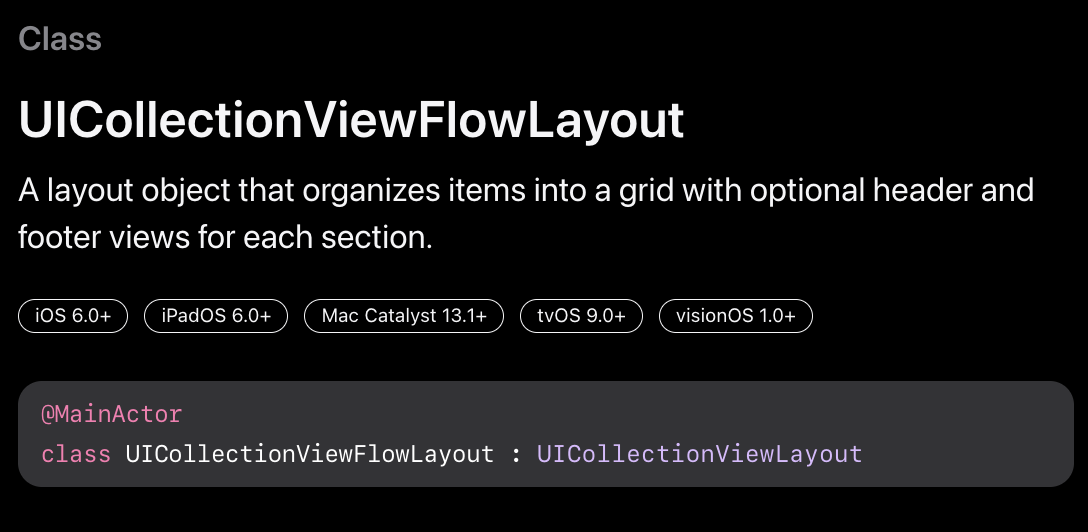
먼저 UICollectionViewFlowLayout 클래스의 인스턴스 layout을 생성

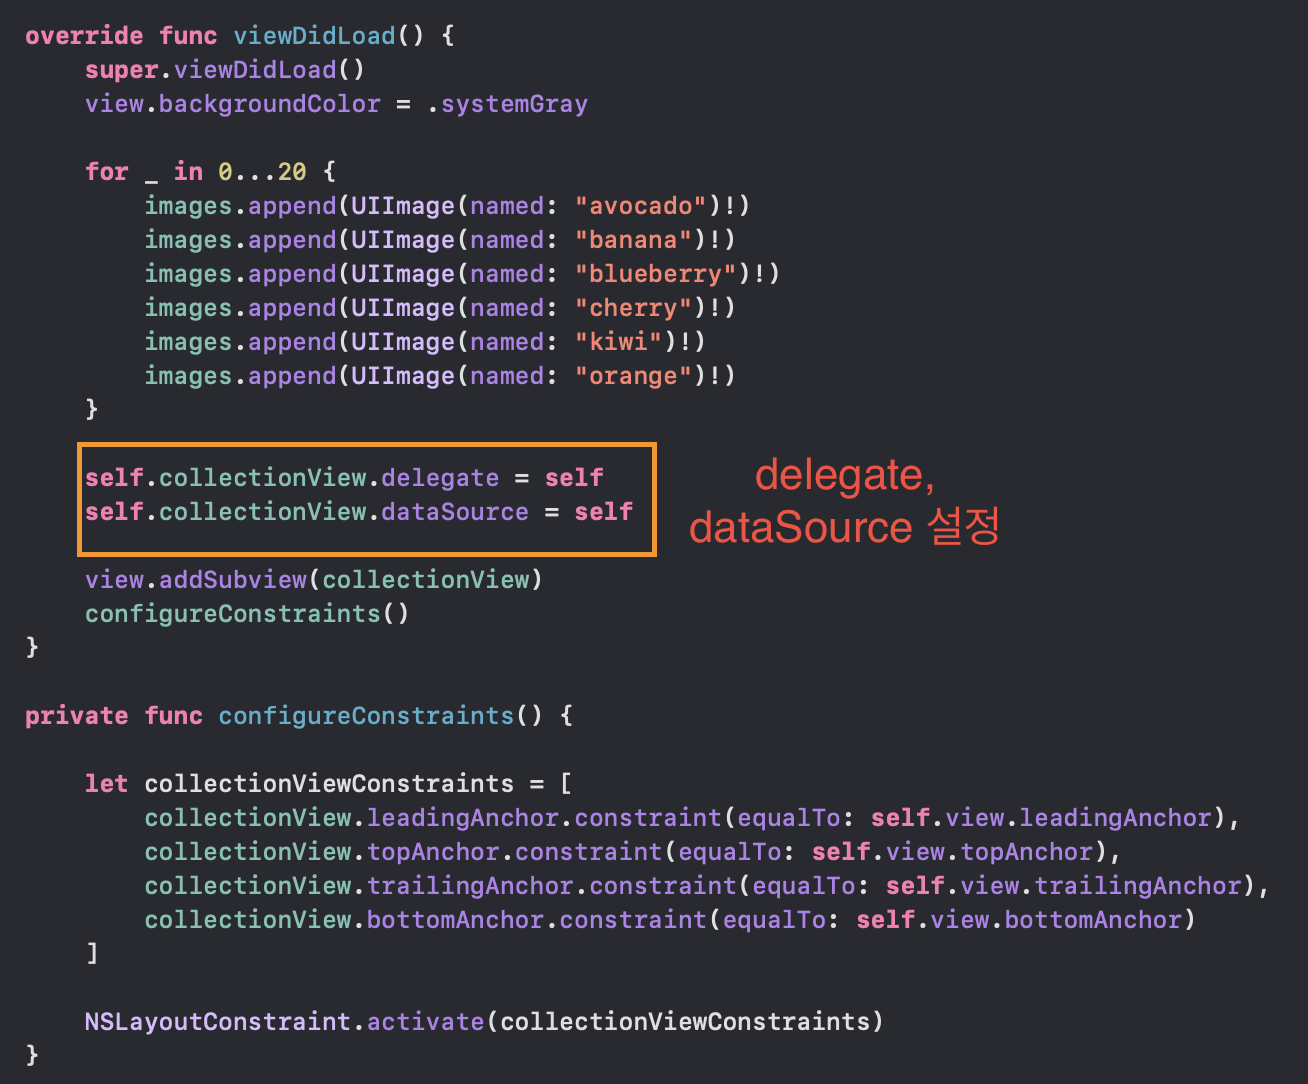
collectionView 인스턴스를 생성

여기서 frame: .zero 는 위치를 초기화 즉, frame의 origin과 size에 0을 준다는 의미
contentInset: 안쪽으로 패딩을 주는 효과
alwaysBounceVertical: 반동을 주는 효과로, 스크롤 끝에 도착해서 더 내리면 이 때 나타나는 반동효과의 유무 결정
showVerticalScrollIndicator: 화면을 내릴 때 오른쪽 화면에 나타는 내림바? 같은 것의 유무 결정

viewDidLoad()를 통해 뷰가 최초로 나왔을 때 나타날 설정을 나타냄
여기서 이미지는 추가로 asset 폴더 내에 이미지 추가함
제약조건도 추가함
CustomCollectionViewCell.swift 파일 생성
collectionView 내에 들어갈 Cell과 관련된 내용 설정
import UIKit
class CustomCollectionViewCell: UICollectionViewCell {
// MARK: - Variables
static let identifier = "CustomCollectionViewCell"
// MARK: - UI Components
var myImageView: UIImageView = {
let imageView = UIImageView()
imageView.translatesAutoresizingMaskIntoConstraints = false
imageView.contentMode = .scaleAspectFill
imageView.image = UIImage(systemName: "questionmark")
imageView.tintColor = .systemGray
imageView.clipsToBounds = true
return imageView
}()
override init(frame: CGRect) {
super.init(frame: frame)
setupUI()
}
required init?(coder: NSCoder) {
fatalError("init(coder:) has not been implemented")
}
func setupUI() {
self.backgroundColor = .systemMint
self.addSubview(myImageView)
myImageView.translatesAutoresizingMaskIntoConstraints = false
NSLayoutConstraint.activate([
myImageView.leadingAnchor.constraint(equalTo: self.leadingAnchor),
myImageView.topAnchor.constraint(equalTo: self.topAnchor),
myImageView.trailingAnchor.constraint(equalTo: self.trailingAnchor),
myImageView.bottomAnchor.constraint(equalTo: self.bottomAnchor)
])
}
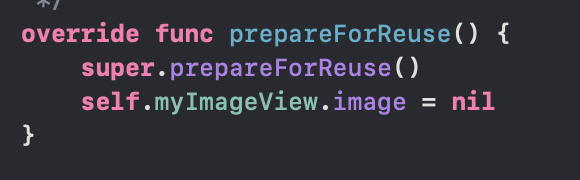
override func prepareForReuse() {
super.prepareForReuse()
self.myImageView.image = nil
}
}
여기서 중요한 점은 prepareForReuse() 함수
셀들이 재사용되는 경우에 셀에 들어가는 내용과는 무관한 alpha? editing 같은 것도 들어가는데 이를 초기화해주는 것
즉, 셀의 속성을 초기화해준다.
이를 통해 인터넷 사용이 느린 곳이나, 빠르게 스크롤할 경우에 셀에 이전 셀 내용이나, 셀의 내용이 빠지는 경우에 대비할 수 있다.
다시 viewController.swift 파일로 돌아와 UICollectionViewDelegate, UICollectionViewDataSource 프로토콜을 채택함

'iOS > UIKIT' 카테고리의 다른 글
| 컬렉션 뷰 설정 (0) | 2024.06.26 |
|---|---|
| 카카오톡 로그인 API 구현 (0) | 2024.05.23 |
| 네비게이션 바에 배경 색상 넣기.... (0) | 2024.02.20 |
| 탭 제스처 + 사진 선택 (0) | 2024.02.02 |
| 알림창 안에 맵 넣기 (2) | 2024.02.01 |