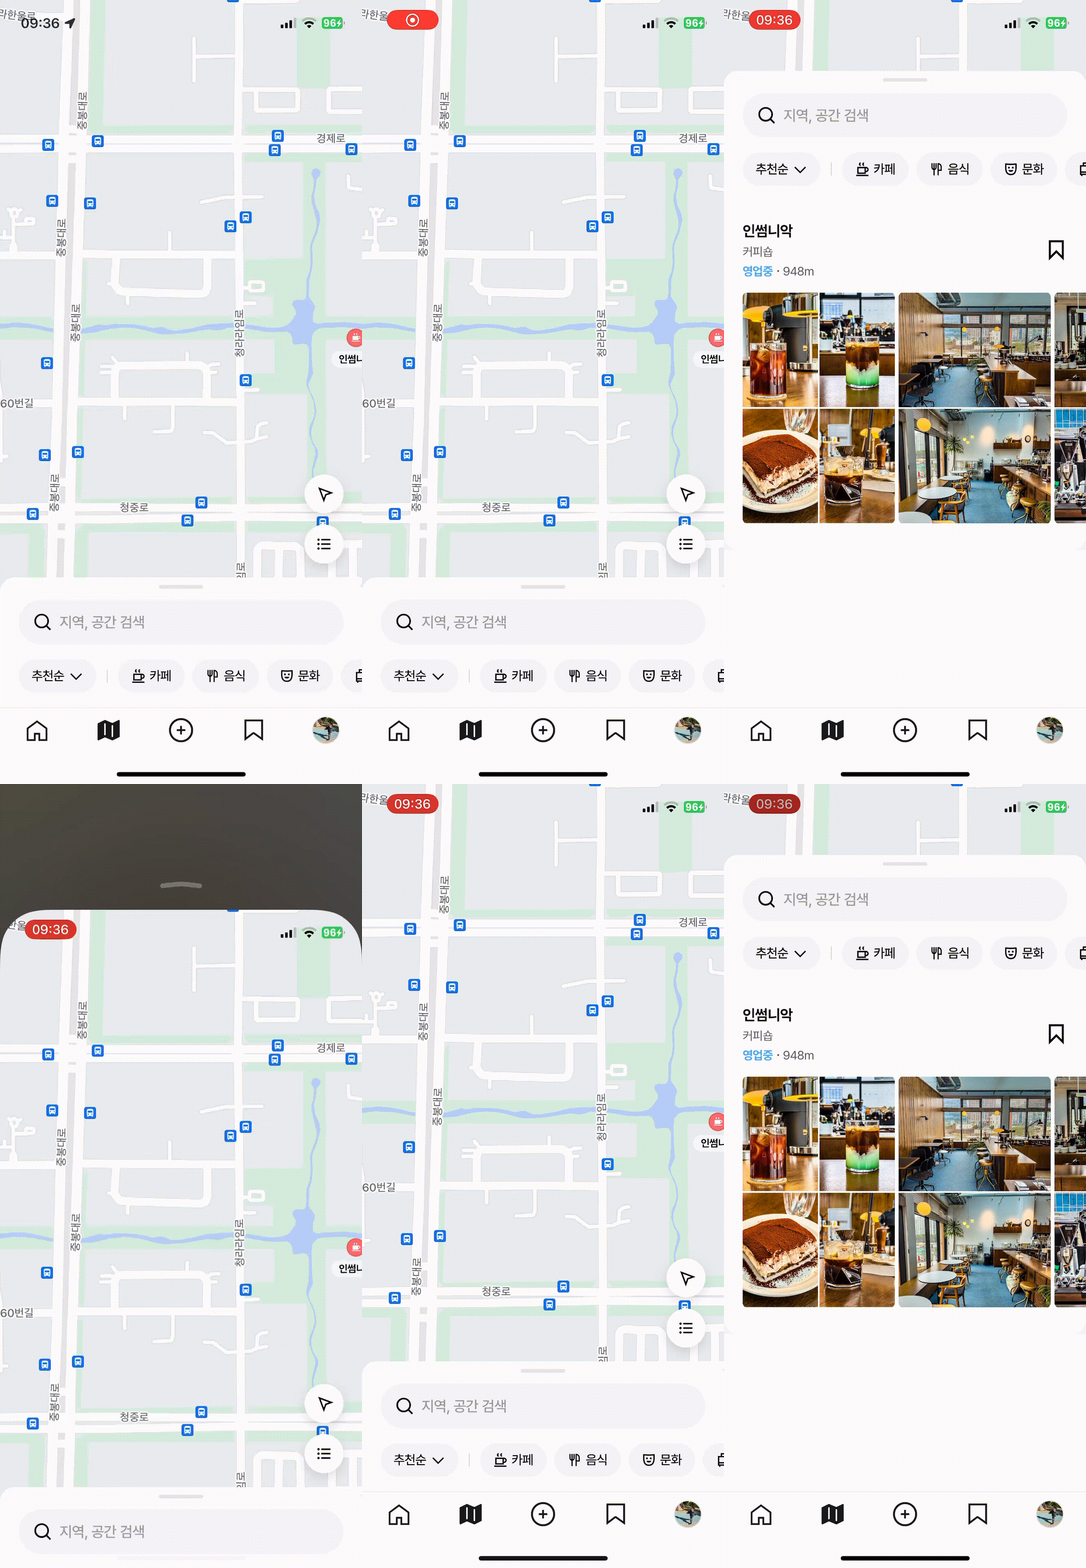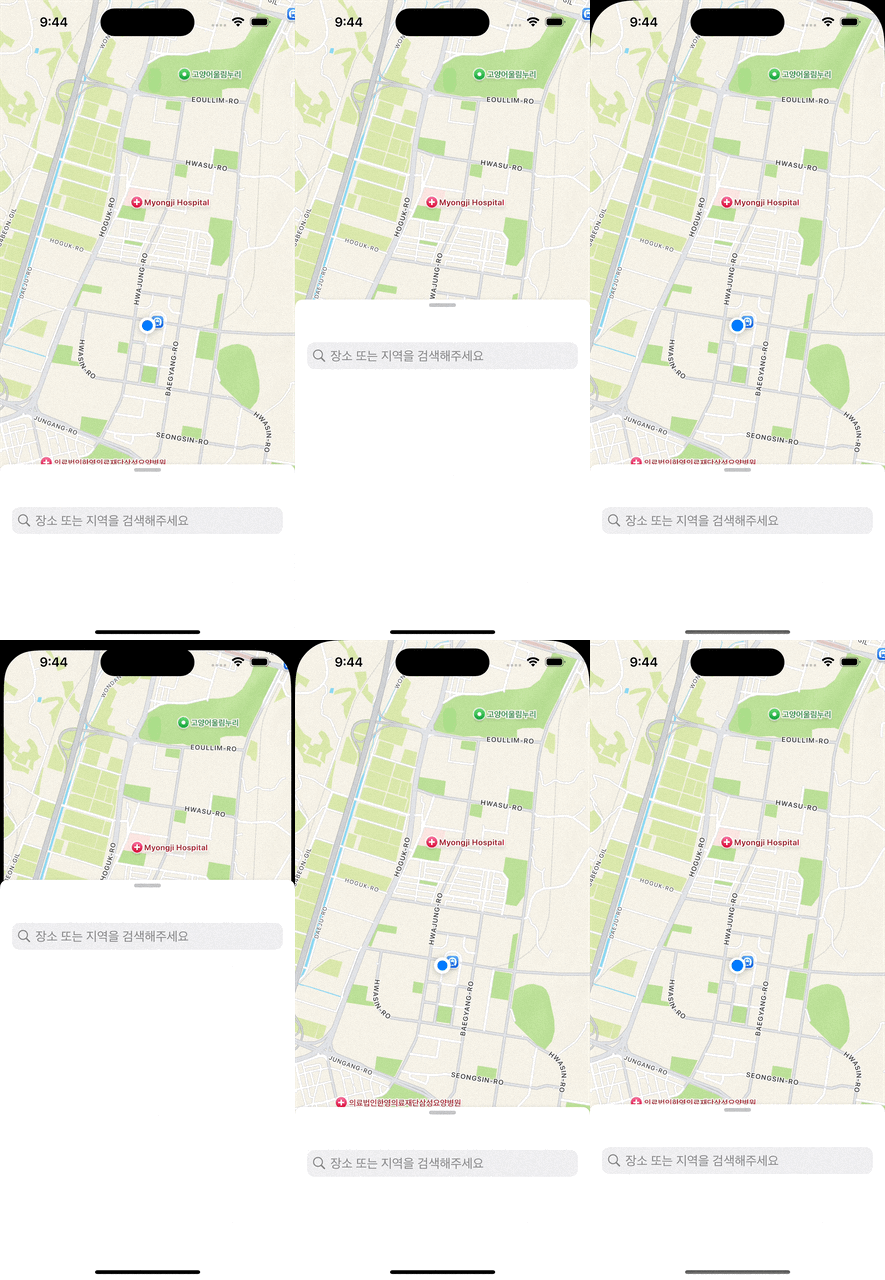
dayTrip이라는 어플에서 Map 검색 부분 처럼 UI를 구성하려고 했습니다.
찾아보니까 UISheetPresentationController의 detent를 사용하여 구성한 것으로 생각했습니다.
import UIKit
import MapKit

class MapViewController: UIViewController {

    // MARK: - Variables
    let locationManager = CLLocationManager()

    // MARK: - UI Components
    let mapView: MapView = {
        let mapView = MapView()
        mapView.translatesAutoresizingMaskIntoConstraints = false
        return mapView
    }()


    // MARK: - Life Cycle
    override func viewDidLoad() {
        super.viewDidLoad()
        view.backgroundColor = .systemBackground
        view.addSubview(mapView)


        mapView.locationMapView.showsUserLocation = true // 사용자 위치 표시
        mapView.locationMapView.delegate = self

        configureConstraints()

        locationManager.delegate = self
        locationManager.requestWhenInUseAuthorization() // 권한 요청
        locationManager.startUpdatingLocation()
    }

    // <---- UISheetPresentationConroller 관련 코드 ----->
    override func viewDidAppear(_ animated: Bool) {
        super.viewDidAppear(animated)
        showModalVC()
    }

    func showModalVC() {

        let mapSearchVC = UINavigationController(rootViewController: MapSearchViewController())

        mapSearchVC.modalPresentationStyle = .formSheet
        mapSearchVC.isModalInPresentation = true  // 완전히 내려가서 닫히는 걸 방지


        if let sheet = mapSearchVC.sheetPresentationController {
            // 기본 medium, large 외에 사용자 정의 detent 추가
            let smallId = UISheetPresentationController.Detent.Identifier("small")
            let customSmallDetent = UISheetPresentationController.Detent.custom(identifier: smallId) { context in
                return 200 // 최소 높이를 여기에서 설정 (150으로 예시)
            }

            // Detents 설정 (최소, 중간, 최대)
            sheet.detents = [customSmallDetent, .medium() ,.large()]
            sheet.largestUndimmedDetentIdentifier = .large
            sheet.prefersGrabberVisible = true // 손잡이 표시

        }
       present(mapSearchVC, animated: true)
    }
    // <---- UISheetPresentationConroller 관련 코드 ----->

    // MARK: - Layouts
    private func configureConstraints() {
        let mapViewConstraints = [
            mapView.leadingAnchor.constraint(equalTo: view.leadingAnchor),
            mapView.trailingAnchor.constraint(equalTo: view.trailingAnchor),
            mapView.topAnchor.constraint(equalTo: view.topAnchor),
            mapView.bottomAnchor.constraint(equalTo: view.bottomAnchor)
        ]
        NSLayoutConstraint.activate(mapViewConstraints)
    }
}


extension MapViewController: CLLocationManagerDelegate, MKMapViewDelegate {

    // 위치 업데이트 시 호출되는 메서드
    func locationManager(_ manager: CLLocationManager, didUpdateLocations locations: [CLLocation]) {
        if let userLocation = locations.first {
            zoomToUserLocation(userLocation)
        }
    }

    // 줌 인 함수
    func zoomToUserLocation(_ location: CLLocation) {
        let regionRadius: CLLocationDistance = 2000 // 줌인 정도 (미터 단위로 설정 가능)
        let coordinateRegion = MKCoordinateRegion(center: location.coordinate, latitudinalMeters: regionRadius, longitudinalMeters: regionRadius)
        mapView.locationMapView.setRegion(coordinateRegion, animated: true)
    }
}

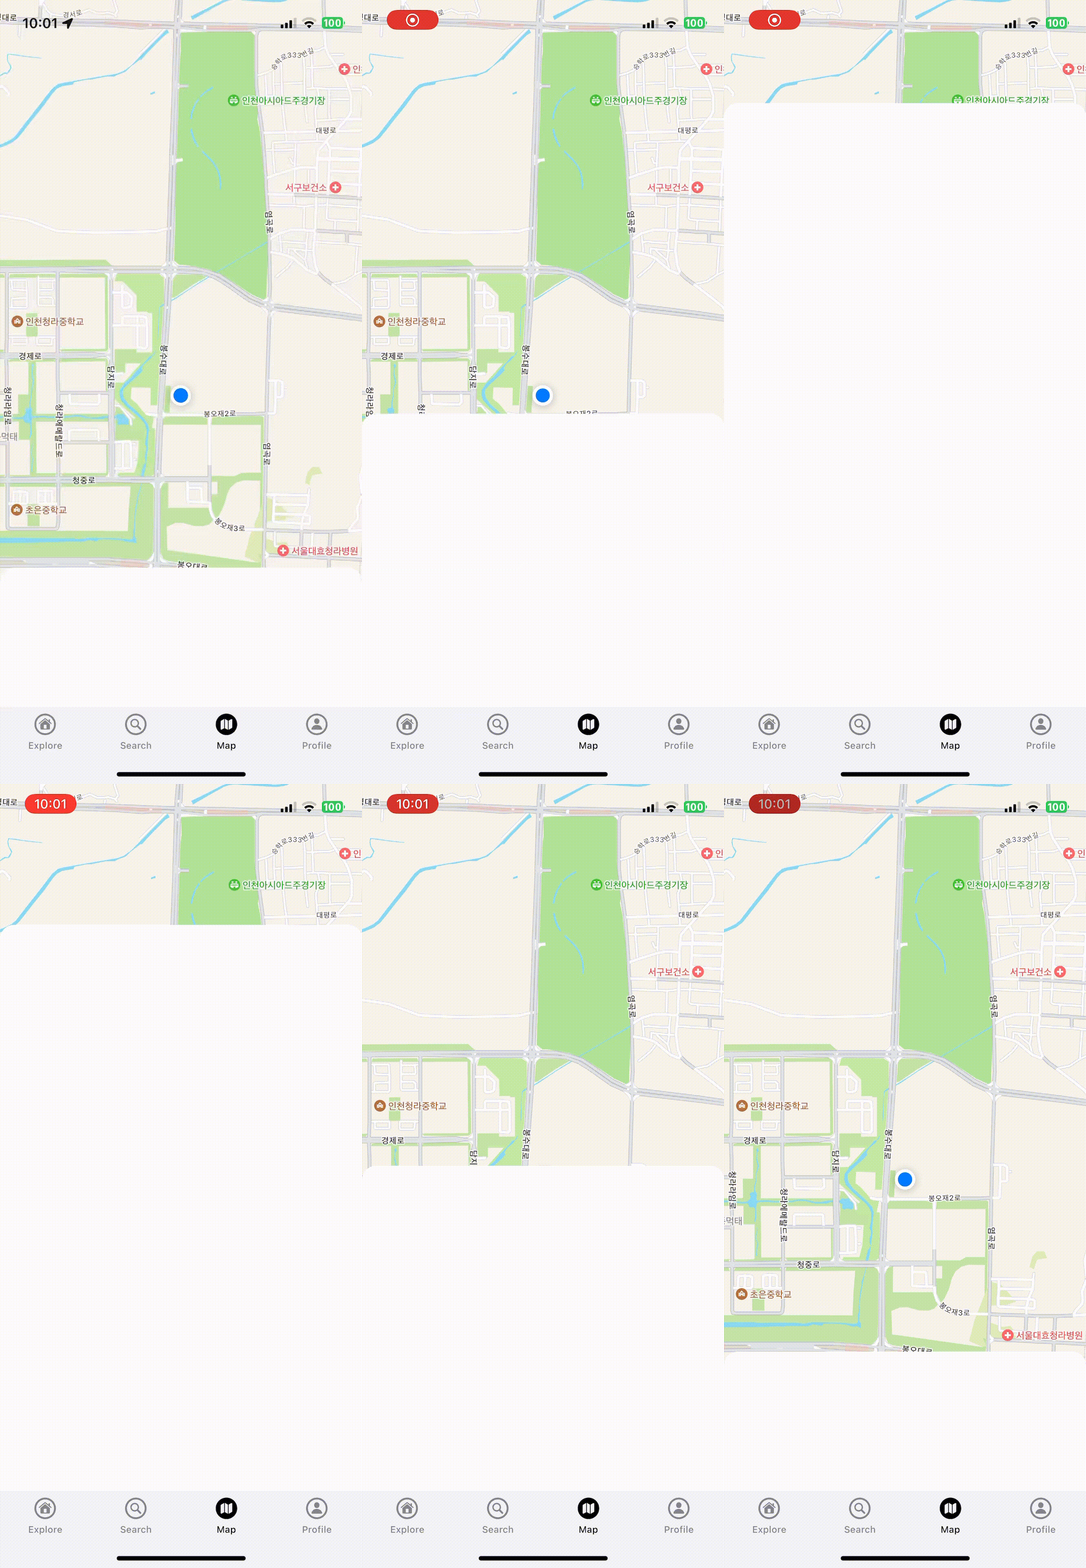
sheetPresentationController을 사용할 경우 탭바가 가려진다는 문제가 있습니다.
import UIKit
import MapKit

class MapViewController: UIViewController {

    // MARK: - Variables
    let locationManager = CLLocationManager()

    // MARK: - UI Components
    let mapView: MKMapView = {
        let mapView = MKMapView()
        mapView.translatesAutoresizingMaskIntoConstraints = false
        return mapView
    }()

    let searchView = UIView() // SearchView가 될 UIView

    var searchViewHeightConstraint: NSLayoutConstraint! // 높이 조절을 위한 Constraint

    // MARK: - Life Cycle
    override func viewDidLoad() {
        super.viewDidLoad()
        view.backgroundColor = .systemBackground

        // Add subviews
        view.addSubview(mapView)
        view.addSubview(searchView)


        configureMapView()
        configureSearchView()

        locationManager.delegate = self
        locationManager.requestWhenInUseAuthorization() // 권한 요청
        locationManager.startUpdatingLocation()
    }

    func configureMapView() {
        mapView.showsUserLocation = true // 사용자 위치 표시
        mapView.delegate = self

        // MapView constraints
        NSLayoutConstraint.activate([
            mapView.leadingAnchor.constraint(equalTo: view.leadingAnchor),
            mapView.trailingAnchor.constraint(equalTo: view.trailingAnchor),
            mapView.topAnchor.constraint(equalTo: view.topAnchor),
            mapView.bottomAnchor.constraint(equalTo: view.bottomAnchor)
        ])
    }

    func configureSearchView() {
        searchView.backgroundColor = .white // 검색창의 배경 색상
        searchView.layer.cornerRadius = 15
        searchView.layer.maskedCorners = CACornerMask(arrayLiteral: [.layerMaxXMinYCorner, .layerMinXMinYCorner])
        searchView.translatesAutoresizingMaskIntoConstraints = false

        // 높이 조절을 위한 제약 설정
        searchViewHeightConstraint = searchView.heightAnchor.constraint(equalToConstant: 150)

        // SearchView constraints
        NSLayoutConstraint.activate([
            searchView.leadingAnchor.constraint(equalTo: view.leadingAnchor),
            searchView.trailingAnchor.constraint(equalTo: view.trailingAnchor),
            searchView.bottomAnchor.constraint(equalTo: view.safeAreaLayoutGuide.bottomAnchor),
            searchViewHeightConstraint // 기본 높이
        ])

        // 패닝 제스처 추가 (높이 조절을 위한 제스처)
        let panGesture = UIPanGestureRecognizer(target: self, action: #selector(handlePanGesture(_:)))
        searchView.addGestureRecognizer(panGesture)
    }

    // MARK: - Pan Gesture Handler for SearchView height adjustment
    @objc func handlePanGesture(_ gesture: UIPanGestureRecognizer) {
        let translation = gesture.translation(in: view)
        let newHeight = searchViewHeightConstraint.constant - translation.y

        // SearchView 높이를 조정하는 코드
        if newHeight >= 150 && newHeight <= 650 { // 최소 높이 150, 최대 높이 650
            searchViewHeightConstraint.constant = newHeight
            gesture.setTranslation(.zero, in: view) // 다음 변환을 위한 초기화
        }

        if gesture.state == .ended {
            // 높이 자동 조정 (미디엄, 라지 등 높이로 자동 스냅)
            if newHeight > 400 {
                searchViewHeightConstraint.constant = 650 // large 높이
            } else if newHeight > 200 {
                searchViewHeightConstraint.constant = 350 // medium 높이
            } else {
                searchViewHeightConstraint.constant = 150 // small 높이
            }

            UIView.animate(withDuration: 0.3) {
                self.view.layoutIfNeeded() // 애니메이션으로 높이 변경
            }
        }
    }
}

// MARK: - CLLocationManagerDelegate and MKMapViewDelegate
extension MapViewController: CLLocationManagerDelegate, MKMapViewDelegate {

    func locationManager(_ manager: CLLocationManager, didUpdateLocations locations: [CLLocation]) {
        if let userLocation = locations.first {
            zoomToUserLocation(userLocation)
        }
    }

    func zoomToUserLocation(_ location: CLLocation) {
        let regionRadius: CLLocationDistance = 2000
        let coordinateRegion = MKCoordinateRegion(center: location.coordinate, latitudinalMeters: regionRadius, longitudinalMeters: regionRadius)
        mapView.setRegion(coordinateRegion, animated: true)
    }
}
주요 포인트:
- 탭 바 위에 뷰 배치: searchView를 tabBarController의 tabBar 바로 위에 배치했고. 이렇게 하면 시트처럼 보이면서도 탭 바를 가리지 않습니다.
- 높이 조절 가능: 제스처를 통해 searchView의 높이를 조절할 수 있고. UISheetPresentationController와 유사한 경험을 제공하면서 탭 바를 가리지 않게 할 수 있습니다.
2. Replace Tab Bar with Custom View
또 다른 방법은 커스텀 탭 바를 만들어 사용하는 것으로. 이렇게 하면 더 많은 컨트롤이 가능해져서 시트가 탭 바를 가리는 문제를 우회할 수 있지만 이 방식은 구현이 복잡해질 수 있습니다.
3. 전환 후 다시 탭 바 보이기
UISheetPresentationController가 탭 바를 가리는 문제를 우회하기 위해 시트를 닫거나 사라질 때마다 탭 바를 다시 보이게 설정하는 것도 방법 중 하나지만 이 방식은 자연스러운 사용자 경험을 제공하지 않을 수 있습니다.
이러한 방식으로 UISheetPresentationController 없이 탭 바를 가리지 않도록 searchView를 구현할 수 있습니다.

UIPanGestureRecognizer는 iOS에서 제스처 인식을 담당하는 클래스 중 하나로, 사용자가 화면에서 드래그(또는 팬) 동작을 했을 때 이를 감지하고 처리하는 데 사용돼. 주로 화면을 스와이프하거나 드래그하는 제스처를 감지해 화면 내에서 객체를 이동하거나 크기를 조절할 때 사용돼.
주요 특징:
- 팬 동작 감지: 사용자가 화면에서 손가락을 움직일 때(팬), UIPanGestureRecognizer는 이 움직임의 시작, 진행, 종료를 감지할 수 있어.
- 위치와 속도 제공: 제스처가 시작된 지점에서부터 얼마나 움직였는지(translation)와 제스처의 속도(velocity)를 제공해.
- 상태 관리: 제스처의 상태를 나타내는 속성(state)이 있어, 제스처가 시작되었는지(.began), 진행 중인지(.changed), 종료되었는지(.ended) 등을 확인할 수 있어.
기본 사용법:
UIPanGestureRecognizer는 주로 UIView에 추가해서 그 위에서 드래그 동작을 감지하고, 그에 따라 UIView를 움직이거나, 크기를 조절하는 등의 작업을 할 수 있어.
// 1. 팬 제스처 인식기 추가
let panGesture = UIPanGestureRecognizer(target: self, action: #selector(handlePanGesture(_:)))
someView.addGestureRecognizer(panGesture)

// 2. 팬 동작 처리 함수
@objc func handlePanGesture(_ gesture: UIPanGestureRecognizer) {
    let translation = gesture.translation(in: view) // 팬 동작으로 이동한 거리

    // someView를 팬 제스처에 맞춰 이동시킴
    someView.center = CGPoint(x: someView.center.x + translation.x, y: someView.center.y + translation.y)

    // 다음 제스처를 위한 translation을 0으로 초기화
    gesture.setTranslation(.zero, in: view)

    // 제스처가 끝났을 때 처리
    if gesture.state == .ended {
        // 제스처 종료 후의 처리 (예: 애니메이션, 위치 조정 등)
    }
}
주요 메서드:
- translation(in:): 제스처가 시작된 위치에서부터 팬 동작에 의해 이동한 거리.
- setTranslation(_:in:): 팬 동작에 의해 이동한 거리를 설정. 일반적으로 이동 후 다음 동작을 위해 값을 초기화할 때 사용돼.
- velocity(in:): 팬 동작의 속도.
상태 체크:
팬 제스처의 상태는 UIGestureRecognizer.State를 통해 관리되며, 팬 동작이 시작되었는지, 진행 중인지, 끝났는지 등의 상태를 알 수 있어.
- .began: 제스처가 시작됨
- .changed: 제스처가 진행 중
- .ended: 제스처가 끝남
- .cancelled: 제스처가 취소됨
UIPanGestureRecognizer를 사용하면 제스처에 반응하여 뷰의 크기 조정, 이동 등과 같은 인터랙티브한 UI를 쉽게 구현할 수 있어.
애니메이션 효과 적용
// MARK: - Pan Gesture Handler for SearchView height adjustment
    @objc func handlePanGesture(_ gesture: UIPanGestureRecognizer) {

        let translation = gesture.translation(in: view)
        /*
         gesture.translation(in: view)는 팬 제스처가 발생한 동안 사용자가 손가락을 얼마나 이동했는지를 반환하는 메서드야.
         translation은 제스처가 시작된 이후로 손가락이 움직인 좌표 차이(x, y)를 나타내는 CGPoint 객체를 반환해. 이 좌표는 특정 뷰(in: view)를 기준으로 계산돼.

         이 값은 제스처가 시작한 지점과 현재 지점 사이의 차이를 나타내며, 위 코드에서는 translation.y가 사용돼서 세로 방향으로 얼마만큼 움직였는지를 계산하는 데 사용되고 있어.
         그 값(translation.y)을 사용해 searchViewHeightConstraint.constant에 더하거나 빼서 searchView의 높이를 실시간으로 조절하는 방식이야. 즉, 팬 제스처로 사용자가 손가락을 얼마나 위아래로 움직였는지에 따라 searchView의 높이가 달라지게 돼.
         */

        let newHeight = mapSearchView.mapSearchViewHeightConstraint.constant - translation.y
        /*
         .constant는 해당 제약 조건의 실제 값을 의미
         */


        // mapSearchView 높이를 조정하는 코드
        if newHeight >= 150 && newHeight <= 650 { // 최소 높이 150, 최대 높이 650 이렇게 조건을 걸어서 mapSearchView가 너무 작아지거나 너무 커지지 않도록 최소 높이와 최대 높이를 설정
            mapSearchView.mapSearchViewHeightConstraint.constant = newHeight
            /*
             이 코드는 팬 제스처로 계산된 newHeight 값을 searchViewHeightConstraint.constant에 할당해서, 실시간으로 searchView의 높이를 조정하는 거야. 사용자가 손가락을 팬 하면 그에 맞춰 뷰의 높이가 즉시 변하는 것.
             */
            gesture.setTranslation(.zero, in: view) // 다음 변환을 위한 초기화
            /*
             의미: 이 코드는 팬 제스처가 끝나지 않았더라도 현재 제스처의 이동값을 초기화하는 역할을 해.
             팬 제스처가 한 번 시작되면 gesture.translation(in:)은 팬이 시작된 지점부터 계속 이동값을 누적해서 계산해. 그래서 제스처가 발생할 때마다 그 누적된 값을 초기화해 주기 위해 gesture.setTranslation(.zero, in: view)를 호출해 이동 거리를 0으로 리셋하는 거야.
             이렇게 함으로써 다음 팬 동작에서 새로운 움직임이 이전 팬 동작에 영향을 미치지 않도록 해주는 거지.
             */
        }

        if gesture.state == .ended {
            var targetHeight: CGFloat

            // 높이 자동 조정 (미디엄, 라지 등 높이로 자동 스냅)
            if newHeight > 400 {
                targetHeight = 650 // large 높이
            } else if newHeight > 200 {
                targetHeight = 350 // medium 높이
            } else {
                targetHeight = 200 // small 높이
            }

            // 스프링 애니메이션을 통해 바운스 효과 적용
            UIView.animate(
                withDuration: 0.5,
                delay: 0,
                usingSpringWithDamping: 0.6, // 바운스 효과 설정 (0에 가까울수록 바운스가 더 큼)
                initialSpringVelocity: 0.8, // 초기 속도 설정
                options: .curveEaseInOut,
                animations: {
                    self.mapSearchView.mapSearchViewHeightConstraint.constant = targetHeight
                    self.view.layoutIfNeeded() // 애니메이션으로 높이 변경
                },
                completion: nil
            )
        }
}'UIKIT' 카테고리의 다른 글
| 서치바를 눌렀을 때 서치바 y축 위치를 조절하는 방법 (1) | 2024.10.11 |
|---|---|
| 왜 서치바 heightAnchor 의 값을 변경했는데.. 왜 높이 조절 안됨? (3) | 2024.10.11 |
| navigationController?.navigationBar.titleTextAttributes (1) | 2024.10.09 |
| DGChart 사용해서 Chart 만들기 (0) | 2024.10.05 |
| 테이블 내에 있는 컬렉션뷰는 어떻게 구분할까? (3) | 2024.09.28 |


